Essa API pode ser usada para criar, atualizar, consultar e gerenciar informações sobre encomendas, oferecendo flexibilidade para integração com diferentes plataformas, como aplicativos móveis, sistemas de e-commerce ou dashboards administrativos.
Requisitos 💻
Antes de clonar o projeto e recomendado você ter os seguintes requisitos:
Necessario ter Python 3+ instalado
Requisito git para clonar
Sua maquina Windows, Linux ou Mac.
Conhecimento basico Django e Django Ninja
Tecnologias 🚀
As principais tecnologias e ferramentas utilizadas neste projeto são:
Python: Uma linguagem de programação de alto nível, versátil e amplamente utilizada, conhecida por sua sintaxe simples e legibilidade. Criada por Guido van Rossum em 1991, ela foi projetada com a filosofia de tornar a programação acessível e eficiente, permitindo que os desenvolvedores se concentrem mais na lógica do problema do que nos detalhes técnicos.
Django: Projetado para facilitar o desenvolvimento de aplicações web robustas, seguras e escaláveis. Ele segue o padrão MVC (Model-View-Controller), embora em Django seja frequentemente chamado de MTV (Model-Template-View), devido à terminologia específica do framework.
Django-Ninja: Um framework leve e rápido para criar APIs usando o Django. Ele é construído sobre o Pydantic e utiliza os recursos modernos do Python, como type hints, para simplificar o desenvolvimento de APIs REST, com foco em desempenho, simplicidade e produtividade.
This project investigates different locomotion techniques in VR. It was developed as part of the course Multimodal Interaction and Interfaces at KTH from December to January 2022. We were a group of four students including Yawen Deng, Fatemeh Bakhshoudeh, Andrea Maderthaner and me.
During the project I improved my Unity programming skills as well as my research skills. More information about our project can be found in our Project Report.
MM_final.Video.1.mp4
Abstract
Technologies have enabled walking in VR environments to be pleasant and immersive. VR
controllers, natural walking and Walking in Place (WIP) are some of the most popular walking
techniques in VR. In order to discover how walking experience is aƀected by these
technologies, a comprehensive evaluation was conducted. The user experience was
investigated in terms of game experience, immersive level and motion sickness level
respectively, of which were measured through questionnaires. In the process, participants
were required to finish the corresponding questionnaires after experiencing one estimated
technology, and were invited to interviews after all three tests. Quantitative data such as speed
and distance was also measured automatically during the game. The evaluation indicated that
Cybershoes, i.e the WIP technology used here, was the most challenging, but most tensive and
tiresome technology; VR controller was the most dizzying one; and natural walking was the
least tiring, but the least challenging one. The reason behind the motion sickness was also
discussed in the view of multimodal interaction, followed by a possible future development, e.g
a deeper investigation on motion sickness and the modification of the controller’s technical
details.
Methods should not have more than an average of 30 code lines (not counting line spaces and comments).
A class should contain an average of less than 30 methods, resulting in up to 900 lines of code.
A package shouldn’t contain more than 30 classes, thus comprising up to 27,000 code lines.
Subsystems with more than 30 packages should be avoided. Such a subsystem would count up to 900 classes with up to 810,000 lines of code.
A system with 30 subsystems would thus possess 27,000 classes and 24.3 million code lines.
Nuget
PM>Install-Package Divis.DarkLinesOfCodeAnalyzer
Roadmap
Here’s the planned feature roadmap:
Feature
Status
max 900 lines per class
✅
max 30 lines per method
✅
ignore blank lines
🔲
Example
The resulting warning might look like this:
> C:\Projects\demo-app\DemoConsoleApp\WeatherService.cs(5,5,1078,6): warning DL0100: The class 'WeatherService' contains 1076 lines of code, maximum recommended amount of lines per class is 900 lines
> C:\Projects\demo-app\DemoConsoleApp\WeatherService.cs(8,9,1077,10): warning DL0200: The method 'GetForecastForCity' contains 48 lines of code, maximum recommended amount of lines per method is 30 lines
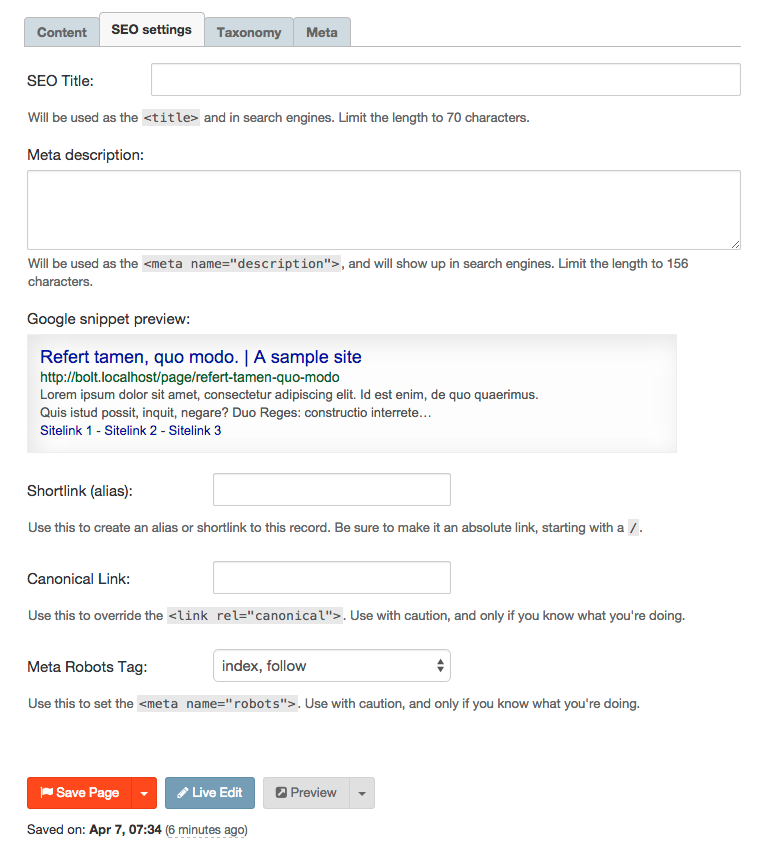
The Bolt SEO extension is an extension to help you improve the search engine
indexing of your Bolt website in a number of ways. It does this by:
Allowing you to specify the SEO title and meta-description for your pages.
Adding meta tags to your HTML to facilitate indexing of your pages using meta
tags and OG tags.
Override the canonical, if you really want to.
Set the <meta name="robots">-tag.
Setup
To use this extension, you should add a field to your contenttypes, and add the
tags to the header of your HMTL templates.
In your contenttypes, you should add a single seo field. The extenion will
use this to store the data for the different fields that show in the backend
when editing a record. Simply add it to your fields like this;
When you’ve done this, all pages that make use of these templates will
automatically have the correct <title> tag and the meta- and OG-tags.
Configure the ‘meta tags’ output
By default, the output of the meta-tags is defined in the file
extensions/vendor/bobdenotter/seo/twig/_metatags.twig. If you’d like to
configure this output, you shouldn’t edit this file directly. If you do,
changes will be overwritten on subsequent updates of this extension. Instead,
in /app/config/extensions/seo.bobdenotter.yml uncomment the following lines:
templates:
    meta: _metatags.twig
Next, copy the file _metatags.twig to your theme folder, and the extension
will pick it up from there.
Note: This is a new extension, so the functionality is still pretty bare
bones. What’s there works well, but there is probably a lot of functionality to
add, to improve search engine indexing. If you’d like to contribute, or have a
good idea, feel free to open an issue on the tracker at the
SEO Extension repository on Github.
Este repositório visa apresentar de maneira simples e enxuta uma solução para implementação de Google Tag Manager ( GTM ) em Single Page Applications utilizando Create React App com objetivo de evitar problemas comuns.
A Estrutura
Envs com códigos de GTM diferentes: .env, .env.production, .env.staging;
jsconfig.json para permitir imports absolutos da pasta src;
package.json com comandos de build, start e test personalizados;
config/index.js que expõe as variáveis de ambiente para utilização;
utils/gtm/index.js que contém o helper de inserção do GTM;
components/Root que implementa o react-router-dom para mudança de rotas e insere script do GTM;
components/App que inicia o objeto de datalayer, contém a declaração das rotas e as observa;
components/Home, components/ReactPresentation e components/VuePresentation servem como “páginas” na alternância de rotas;
Runs the app in the development mode.
Open to view it in the browser.
The page will reload if you make edits.
You will also see any lint errors in the console.
yarn test
Launches the test runner in the interactive watch mode.
See the section about running tests for more information.
yarn build
Builds the app for production to the build folder.
It correctly bundles React in production mode and optimizes the build for the best performance.
The build is minified and the filenames include the hashes.
Your app is ready to be deployed!
See the section about deployment for more information.
yarn eject
Note: this is a one-way operation. Once you eject, you can’t go back!
If you aren’t satisfied with the build tool and configuration choices, you can eject at any time. This command will remove the single build dependency from your project.
Instead, it will copy all the configuration files and the transitive dependencies (webpack, Babel, ESLint, etc) right into your project so you have full control over them. All of the commands except eject will still work, but they will point to the copied scripts so you can tweak them. At this point you’re on your own.
You don’t have to ever use eject. The curated feature set is suitable for small and middle deployments, and you shouldn’t feel obligated to use this feature. However we understand that this tool wouldn’t be useful if you couldn’t customize it when you are ready for it.
-m|--max <number> – Set max number of log entries to list. Defaults to 10.
-r|--reverse – Whether to read events from oldest to newest. Defaults to newest to oldest.
-f|--from <date> – List log entries from (including) given date/time.
-t|--to <date> – List log entries to (including) given date/time.
-l|--level <name> – Only list log entries matching given log level name. Can be repeated.
-s|--search <term> – Search in any field for the given text. Can be repeated.
-a|--all – Set whether all search terms must be found or just one for a match.
-x|--export <path> – Set path to export result as JSON to.
Examples
List the about/help screen.
eventy --help
List all log names.
eventy
List log entries under the Application log name.
eventy Application
List 100 log entries under Application, list from oldest to newest
eventy Application -m 100 -r
View a single log entry under the Application log name.
eventy Application 123456
Search for, and display log entry with record ID 123456.
eventy 123456
Search for all log entries under the Application name that are after (and including) December 1st 2024, and match log levels info/error/critical, and contains search terms foo and/or bar.
eventy application -m -1 -f 2024-12-01 -l info -l error -l crit -s foo -s bar
tRECS

Text recommendation system developer built in Python and Dash by Plotly.

Authors: Taylor Olson, Janie Neal, Christiana Prater-Lee, Eshita Nandini

This recommendation system developer guides the user through cleaning their data, building models, and ultimately creates a recommendation system (housed within the interface). The user can also visualize some the models and other features of their data.

INSTALLATION

The user should be using python 2.7+. Most packages required for the interface can be installed in the command line by navigating to the directory containing the reqs.txt file and running "pip install -r reqs.txt". Some packages require further installation. Links to their installation documentation are provided below.

Spacy: https://spacy.io/docs/usage/
Follow the instructions for downloading the english model.

NLTK:     http://www.nltk.org/data.html#
Follow the instructions to open the interactive installer and install the following corpora: wordnet, wordnet_ic, words, and stopwords.


HOW TO START THE DASH INTERFACE

In order to start the interface, the user should navigate to the "interface" folder in the command line and call "python interface.py". The command window will provide a link that the user can then copy into the address bar of a browser of their choice. The interface should open in that window, and the user can begin using the features.


FEATURES OF THE INTERFACE AND HOW TO USE THEM

Upload your own data:
User can copy custom data (see sample data for desired format) into the interface folder or use some of the sets included in the interface folder.

Inside the interface the user should select the name of the file and press upload, then select the name of column within the file that contains the names of the objects that are described in the description column(selected next). The description column  should contain the text that will be analyzed. Click next step.

Choose your own cleaning options:
User is required to remove non-ascii characters and punctuation. There are also other optional cleaning features.
stemming vs. lemmatizing: https://nlp.stanford.edu/IR-book/html/htmledition/stemming-and-lemmatization-1.html

Word cut off:
Numbers on the slider indicate the percentage of documents that the words appear in. Use the slider to remove words that occur too frequently or not frequently enough.

Choose and Build your models:
Options are TF-IDF, LSA, LDA, and spaCy's built in similarity function.

Recommendation:
Uses the models built in the previous step to provide the selected number of most similar objects to the selected object.

Visualizations:
The following visualizations have been connected to the interface: entity visualization, lda clustering. Please see their descriptions in the description of visualizations.py.


CONTENTS OF MASTER FOLDER

Interface.py: contains the code needed for front end of application, including: HTML layout, Dash components and event handlers, calls to backend. Contains iqss_interface object (below).

Iqss_interface.py: contains all coded needed for back end of application, including: user loaded data frame, cleaned data frame, and built models. Contains two objects, the iqss_interface object (holds the data frames) and the model_object (holds the necessary df, tf-idf, lda, and spacy models).

Utils.py: contains all methods used for manipulating data frames, including: converting to term and document frequency matrix, cleaning the data frame, extracting entities from the data frame, and determining the number of topics based on the contents of the data frame.

Visualizations.py: contains all code necessary to build the various visualizations, including:
the LDA cluster graph: http://brandonrose.org/clustering
the similarity graph: a graph that plots the similarity score of an object on the x axis, and the group which the object is part of is plotted on the y axis
LDA topic distribution: https://pyldavis.readthedocs.io/en/latest/readme.html#installation
oVirt maintains multiple Ansible roles that can be deployed to easily configure and manage various parts of the oVirt infrastructure. Ansible roles provide a method of modularizing your Ansible code, in other words; it enables you to break up large playbooks into smaller reusable files. This enables you to have a separate role for each component of the infrustructure, and allows you to reuse and share roles with other users. For more information about roles, see Creating Reusable Playbooks in the Ansible Documentation.
Currently we have implemented following Ansible roles:
oVirt.shutdown_env – shutdown the whole environment in a clean and ordered way.
Installing the oVirt Roles
There are multiple methods to install the Ansible roles on your Ansible server.
Installing from a Package
Note: You must have the official oVirt repository enabled. For more information see the oVirt Deployment Options.
The Ansible roles are packaged into an RPM file that can be installed from the command line.
Run the following command to install all roles:
# yum install ovirt-ansible-roles
Run the following command to install specific role:
# yum install ovirt-ansible-infra
To search all available roles you can execute following command:
# yum search ovirt-ansible
By default the roles will be installed to /usr/share/ansible/roles.
The structure of the ovirt-ansible-roles package is as follows:
/usr/share/ansible/roles – stores the roles.
/usr/share/ansible/roles/{role_name} – stores the specific role.
/usr/share/doc/ovirt-ansible-roles/ – stores the examples, a basic overview and the licence.
/usr/share/doc/{role_name} – stores the documentation and examples specific to the role.
Installing using Galaxy
Ansible provides a command line utility to install Roles directory from the Galaxy Repository. See the Galaxy website for more information about Galaxy.
To install the roles using Galaxy, run the following from the command line:
By default the roles will be installed to /etc/ansible/roles.
The structure of ovirt.ovirt-ansible-roles is as follows:
/etc/ansible/roles/ – stores the roles.
/etc/ansible/roles/{role_name} – stores the specifc role.
/etc/ansible/roles/{role_name}/examples – stores the examples, a basic overview
Getting Started
This section will guide you through creating and running your playbook against the engine.
The following example connects to the engine on the local host and creates a new data center. The current working directory is /tmp.
Note: Ensure you have Python SDK installed on the machine running the playbook.
Create a file in your working directory to store the engine’s user password:
Note: If you prefer, these variables can be added directly to the playbook instead.
Create your playbook. To simplify this, you can copy and modify an example in /etc/ansible/roles/ovirt.ovirt-ansible-roles/examples or /usr/share/doc/ovirt-ansible-roles/examples depending on the method used to install the roles:
Aprendendo quais são os papéis de um DBA; entendendo como um banco de dados funciona na arquitetura cliente-servidor; aprendendo a gerenciar o serviço do banco de dados; entendendo sobre a administração e otimização do ambiente, do hardware até o software; conhecendo na prática alguns processos de manutenção de bancos de dados; aprendendo com detalhes e na prática sobre backup; otimizando queries utilizando o planejador de queries e índices; mantendo o ambiente seguro gerenciando acessos, usuários, permissões.
É possível parar o servidor através do pg_ctl, porém é importante saber quando interromper a execução do servidor. O motivo mais comum é o caso de manutenção física, em que é necessário desligar ou reiniciar o servidor. O ideal é interromper o serviço do PostgreSQL para garantir que nada seja perdido.
Caso o servidor esteja sendo atacado é imprescindível derrubá-lo para impedir dano ou roubo de informações. Mantendo inativo até que a falha seja investigada e corrigida.
Comando para parar o servidor:
pg_ctl stop
Ao não permitir o seu uso como root, o pg_ctl se “autolimita” garantindo que ele não terá acesso a coisas que não deveria. Isso é uma camada a mais de segurança ao servidor.
3. Tuning de banco
Tuning de hardware e nuvem
Tuning é a otimização do banco de dados e ela pode ser feita no hardware, no banco de dados e/ou no sistema operacional. Tendo isso em mente, é necessário verificar alguns pontos, descritos abaixo:
Preferência a processadores e sistemas 64bits;
Analisar a relação entre RAM e a base de dados;
Ver o tipo de leitura do disco;
Usar RAID.
Um DBA possui diversas funções e gerenciar o hardware e o SO são apenas parte dessas funções.
Serviços em nuvem como Azure, Amazon, Google Cloud podem tirar uma parte do fardo do DBA.
Porém um DBA ainda se faz muito necessário para manutenção, otimização, backup, etc.
Configurações do PostgreSQL
Parâmentros de interação via arquivo de configuração:
shared_buffers
quantidade de memória dedicada ao cache
15% a 25% do total de RAM
work_mem
quantidade de memória dedicada a operações como ordenação
25% do total de RAM / max_connections
maintenance_work_mem
quantidade de memória dedicada a operações de manutenção
5% do total de RAM
Algumas configurações para o servidor do PostgreSQL:
Por questões de performance é bem mais rápido para o PostgreSQL executar uma query gerenciando dados excluídos e atualizados, mantendo algumas informações desatualizadas e, digamos, inúteis. Isso causa menos verificações.
Conhecendo o VACUUM
O VACUUM serve para coletar o lixo. Ele também analisa um banco de dados para isso.
VACUUM FULL trava a base de dados e reescreve todo o conteúdo da tabela em um novo arquivo de disco
VACUUM VERBOSE imprime um relatório detalhado da atividade de limpeza para cada tabela
VACUUM ANALYZE atualiza as estatísticas para determinar a maneira mais eficiente de executar uma consulta
Quando usar cada comando?
O VACUUM normalmente só é utilizado quando o autovacuum por algum motivo não fizer seu trabalho.
O VACUUM FULL é utilizado quando temos muito desperdício de espaço. Normalmente quando a maioria dos registros de uma tabela já foram excluídos ou alterados.
O VACUUM ANALYSE é um comando a parte. Então o VACUUM faz seu trabalho e depois chama esse outro comando para que ele possa analisar a estrutura e os dados das tabelas e atualizar as estatísticas para o planejador de query.
VACUUM vs VACUUM FULL
VACUUM
VACUUM FULL
Verifica apenas tuplas mortas
Verifica todas as tuplas
Não bloqueia acesso
Requer acesso exclusivo
Lança memória para a tabela
Lança memória para o sistema
Não reordena os indexes
Reordena os indexes
Não necessita de mais espaço
Precisa do dobro do espaço
Processos de manutenção
O REINDEX atualiza a tabela de índices. Muito útil nos casos em que os registros foram excluídos e não mais existem na tabela, mas seu espaço na memória permanece.
REINDEX TABLE instrutor;
5. Backup e restauração
Processos de backup (exportação)
Backup é a cópia dos arquivos e registros de um banco.
Backup frio
servidor inativo, nenhuma conexão permitida
Backup morno/quente
servidor ativo, conexões ativas acontecendo
Backup lógico
cópia da estrutura e dos dados
Backup físico
cópia dos arquivos binários utilizados
Comando para realizar o backup:
pg_dump -f /tmp/dump.sql
Comandos para ler o arquivo do bakcup:
/tmp/dump.sql
more /tmp/dump.sql
Restaurando backups (importação)
O arquivo dos backups realizados podem ser importados para o banco em caso de perda de registros.
Comando para restaurar o backup:
psql alura < /tmp/dump.sql
6. Planejamento de queries
Plano de execução (EXPLAIN)
O comando EXPLAIN explica o que o PostgreSQL faz com a query que foi executada. No caso abaixo, ele faz a busca de instrutores totais, para só depois realizar o filtro pelos salários.
EXPLAIN SELECT*FROM instrutor WHERE salario >1500;
O comando CREATE INDEX cria um índice na coluna especificada de uma tabela. Os índices são usados principalmente para aprimorar o desempenho do banco de dados.
CREATEINDEXidx_salarioON instrutor(salario);
O comando REINDEX realiza uma nova organização em uma índice existente. Um índice pode ser organizado a partir de um índice criado anteriormente, uma tabela, esquema, base de dados, nome específico.
Quando não utilizar índices:
Em queries simples, índices podem acabar informando ao PostgreSQL que mais trabalho precisa ser feito, deixando a query mais custosa. Use índices com moderação.
Sempre que inserir, atualizar ou remover um registro, os índices precisar ser reorganizados. Isso custa tempo e processamento. Use índices com moderação.
7. Usuários e permissões
Arquivo pg_hba
A autenticação do cliente é controlada pelo arquivo de configuração pg_hba.conf. Ele fica armazenado no diretório do banco de dados. HBA significa autenticação baseada em host.
O arquivo pg_hba.conf serve para limitar o acesso de determinados hosts ao servidor. Pode-se configurar para que apenas IPs específicos possam acessar o servidor. Isso ajuda muito na questão de segurança, dificultando possíveis ataques.
Criando uma role
Uma ROLE pode ser um usuário ou um grupo de usuários.
Comando para criar um usuário:
-- Na sintaxe básica apenas cria o cargo, que pode ser utilizado depois
CREATE ROLE nome;
-- Criando de uma dessas formas, define que o usuário pode fazer login
CREATE ROLE nome LOGIN;
CREATEUSERnome;
Para criar um usuário através do terminal, pode-se utilizar o comando createuser diretamente no servidor.
O atributo SUPERUSER faz com que o ROLE ignore todos os atributos de restrição. Um SUPERUSER pode fazer tudo no banco de dados. Pode criar novos usuários, definir senhas, criar novos bancos, etc. A recomendação é que os usuários fornecidos para clientes externos JAMAIS tenham esse atributo.
Definindo permissões
O comando REVOKE revoga todos os privilégios do usuário
REVOKE ALL ON DATABASE alura FROM nome;
O comando GRANT garante um ou mais privilégios ao usuário
Packages for managing connection to Db2 As400 using driver COM dot net and ODBC. It is built on lumen laravel.
It is a collection of attributes and methods to simplify connection to DB2 As400. The main purpose of this library is standarization of code in my small organization. It will provide basic operation of database connection.
How to use it on your project.
Running this script on your lumen / laravel project directory composer require masterpis/db2as400
Database configuration on .env on laravel or lumen project
If you use ODBC Driver, you can use configuration below :
Open your Model, remove default eloquent and load this packages by this code use Masterpis\Db2as400\Model;
Change extends from default eloquent to this packages
<?php
namespace App;
use Masterpis\Db2as400\Model;

class Employee extends Model{
    protected $table ="oplenhp.employee";
    protected $fields= ["id", "name", "phone"];

    public function __construct(){
        parent::__construct();
    }
}
?>
Use your model on controller
<?php

namespace App\Http\Controllers;

use App\Employee;
use Laravel\Lumen\Routing\Controller as BaseController;

class TestController extends BaseController{

    public function get()
    {
        $mmusid = new Employee;
        $mmusid->where(['id'=>'1']);
        $a=$mmusid->first();
        dd($a)
    }

}
Methods reference:
Clause configuration. Call method before method where();
/**
 * The query clause like.
 * @param array
 * @return void
 */
$mmusid->like($like)

/**
* The query clause order
* @param array
* @return void
*/
$mmusid->orderBy($order)

/**
 * The query clause limit
 * @param int
 * @return void
 */
$mmusid->limit($limit)

/**
 * The server RDBMS, for multiple env only
 * @param int
 * @return void
 */
$mmusid->setServer($server)

/**
* The user in charge. Registered user running commands
* @param @string
* @return void
*/
$mmusid->setUser($user)
Main method
/**
 * The query clause where
 * @param array $where
 * Simple clause where ex. ["field"=>"keyword"]
 * Complex clause on where ex
 * [""=>"(field1='".$keyword1."' or field2='".$keyword2."') and field2 like '%".keyword3."%'"]
 * @param string $console
 * NULL, CONSOLE will display query generated, ASPARAM will assign query to var $query
 * @return void
 */
$mmusid->where($where=NULL, $console=NULL)

/**
 * Get list array of executed query
 * @return array
 * @return false
 */
$mmusid->get()

/**
 * Get single array of executed query
 * @return array
 * @return false
 */
$mmusid->first()

/**
 * @param array filter
 * @return int
 */
// generate select count(*) from xxx
$mmusid->count($filter=NULL)

// Generate insert into query
/**
* @var array $person
* @var string $console=NULL
* return void
*/
$mmusid=>insert($person)

//Generate delete query
/**
* @var array $filter=NULL
* @var string $console=NULL
* @return void
*/
$mmusid->delete($filter)

    ```


> Compability
You have to install driver COM or ODBC to make it run.
If you have iSeries packages like iSeries Navigator, you can install it, the driver automatically installed


 https://github.com/danielBRTanimacao/order-manager-api