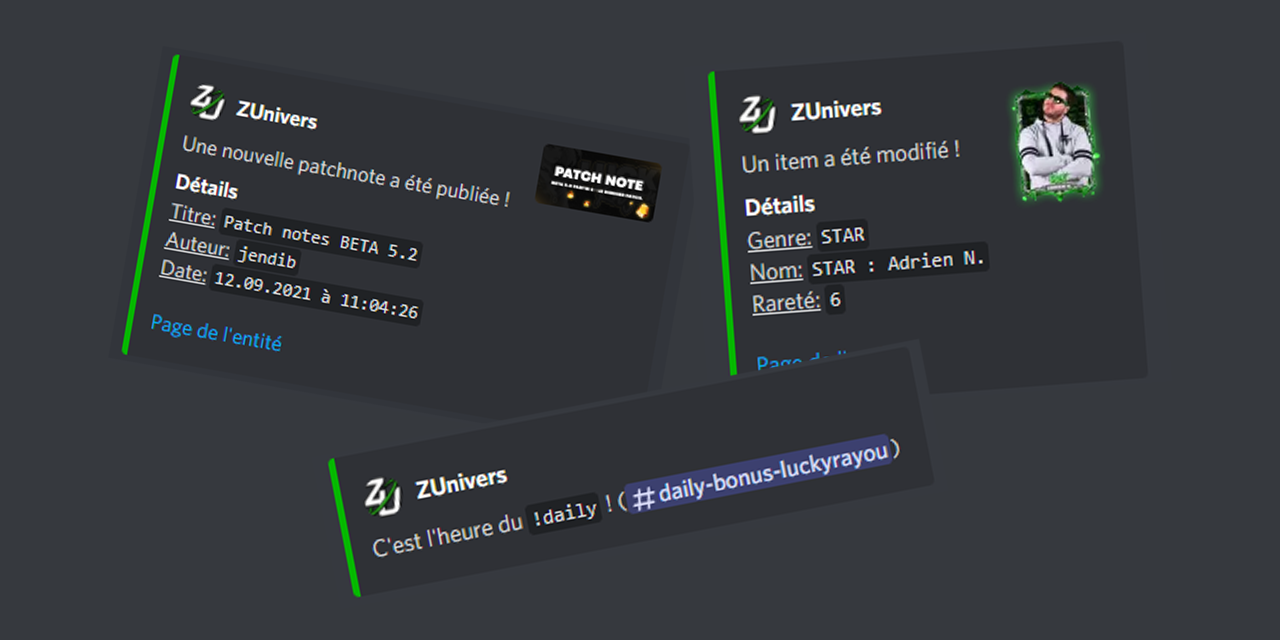
Discord webhooks dispatcher for the ZUnivers card game.
Disclaimer
This project is not affiliated with the ZUnivers’s project. It’s a community project.
Features
All events/checks can be enabled/disabled based on your needs using the enabled: true/false booleans in config file
✅ !daily reminder
✅ Notifies for new patchnotes
✅ Notifies for configuration changes
✅ Notifies for new webapp versions
✅ Notifies for new items/item changes
✅ Notifies for new packs/packs changes
✅ Notifies for new banners/banners changes
✅ Notifies for new “ascension” season
✅ Notifies for new event/events changes
✅ Notifies for new achievements/achievements changes
✅ Notifies for new challenges
✅ Notifies for shop changes
✅ Notifies for API response model changes (disabled by default)
✅ Multiple webhooks dispatching (as a pool to mitigate Discord rate limits)
Usage
Install the package with go install github.com/alexpresso/zunivers-webhooks@latest
Open a CLI and run zunivers-webhooks to make it create a default config
Edit config.json and add
your webhook endpoint(s). You can add
multiple webhook URLs to dilute the Discord rate limiting (number of message you can send per second) on multiple
endpoints. I recommend you add at least 5.
Run zunivers-webhooks again and you’re done.
Note: you can also deploy zunivers-webhooks to a kubernetes cluster using the
following helm chart
This project aims to provide a simple and complete user interface for your private docker registry. You can customize the interface with various options. The major option is SINGLE_REGISTRY which allows you to disable the dynamic selection of docker registries (same behavior as the old static tag).
Select multiple tags to delete with checkboxes (see #29 and #79). Since 1.2.0
Select all tags of the page with ALT + Click on the indeterminate checkbox (see #80 and #81). Since 1.2.1
Select all contigous tags between two tags with Shift + Click on the first tag then Shift + Click on the second tag (see #287). Since 2.4.0
Show sha256 for specific tag (hover image tag).
Sort the tag list with number compatibility (see #45 and #46). Since 0.4.0
Share your docker registry UI without installation or when you are deploying a UI with SINGLE_REGISTRY=false.
Use the public demo and the query parameter url (e.g. https://joxit.dev/docker-registry-ui/demo?url=https://registry.example.com). If you need credentials on your private registry, you must set the Access-Control-Allow-Origin to https://joxit.dev.
You can use a single interface with many registry, add them in the menu in the top right of the page.
Filter images and tags with the search bar.
You can select the search bar with the shortcut CRTL + F or F3. When the search bar is already focused, the shortcut will fallback to the default behavior (see #213). Since 2.1.0
Multi arch support in history page (see #130 and #134). Since 1.5.0
Show the content of the dockerfile (see #286). Since 2.4.0
The UI will cache requests from your registry, such as blobs and some manifests (URL with sha256:).
What is the difference between SINGLE_REGISTRY=false and SINGLE_REGISTRY=true options ?
When SINGLE_REGISTRY is set to false, a menu appears on the interface allowing you to dynamically change docker registry URLs.
Why, when I delete all tags of an image, the image is still in the UI ?
This is a limitation of docker registry, the garbage collector don’t remove empty images. If you want to delete dangling images, you will need to delete the folder in your registry data. (see #77)
Why the image size in the UI is not the same as displayed during docker images ?
The UI displays the compressed size of the image and not the extracted size version.
Can I use HTTPS on the UI ?
Yes, put your favourite reverse proxy on the front of the UI. Your reverse proxy will take care of HTTPS connection.
Does the UI support authentication ?
Yes, but it supports only basic auth. It’s a simple standalone frontend, it will use your browser window for authentication.
Can I use the UI and docker client with an insecure registry (registry url without https) ?
Yes you can, you must first configure your docker client. (see #76)
What does Mixed Content error mean ?
This means you are using a UI with HTTPS and your registry is using HTTP (unsecured). When you are on a HTTPS site, you can’t get HTTP content. Upgrade you registry with a HTTPS connection.
Why the default nginx Host is set to $http_host ?
This fixes the issue #88. More about this in #113.
Why OPTIONS (aka preflight requests) and DELETE fails with 401 status code (using Basic Auth) or why the UI says to check my Access-Control-Allow-Origin ?
This is caused by a bug in docker registry, it returns 401 status requests on preflight requests, this breaks W3C preflight-request specification. I contacted docker registry maintainers and this will never be fixed (distribution/distribution#4458). I suggest to have your UI on the same domain than your registry e.g. registry.example.com/ui/ or use NGINX_PROXY_PASS_URLor configure a nginx/apache/haproxy in front of your registry that returns 200 on each OPTIONS requests. (see #104, #204, #207, #214, #266, #278).
Can I use the docker registry ui as a standalone application (with Electron) ?
I deleted images through the UI, but they are still present on the server. How can I delete them?
When you delete an image with the UI, only the reference is deleted and not the content. To remove dangling images, you need to run the garbage collector of the registry with the command registry garbage-collect config.yml or docker exec registry registry garbage-collect config.yml. (see #77, #147)
Why when I delete one tag, all tags with the same SHA are deleted ?
This a docker registry API limitation, there is only one way to delete images with tag, it’s by its name and its manifest (it’s a sha of the content). So when you delete a tag, this will delete all tags of this image with the same SHA/manifest.
Can I run the container with an unprivileged user ?
Yes you can run the container with the nginx user with the option --user nginx, this will also update the listen port to 8080 (see #224 and #234).
Can I use the UI with a docker hub mirror and show library/* images ?
Yes but it is at your own risk using two regstry servers, check the comment #155.
How to fix CORS issue on s3 bucket ?
You should add a CORS Policy on your bucket, check the issue #193.
Why my docker registry server is returning an error pagination number invalid ?
Since docker registry server 2.8.2 there is default limit of 1000 images in catalog. If you need more images update the configuration REGISTRY_CATALOG_MAXENTRIES with your max value and check the issue #306.
I’m using NGINX_PROXY_PASS_URL, my registry server has been recreated and the UI cannot connect with the message [error] 176#176: *2 connect() failed (111: Connection refused) while connecting to upstream, what can I do?
Nginx get the IP of all addresses only once at runtime, since your container has been recreated, its IP changed too. To prevent this kind of issue, you may use the option NGINX_RESOLVER and set to 127.0.0.11.
Need more informations ? Try my examples or open an issue.
Available options
You can run the container with the unprivileged user nginx, see the discussion #224.
Some env options are available for use this interface for only one server (when SINGLE_REGISTRY=true).
REGISTRY_URL: The default url of your docker registry. You may need CORS configuration on your registry. This is usually the domain name or IP of your registry reachable by your computer (e.g http://registry.example.com). (default: derived from the hostname of your UI).
REGISTRY_TITLE: Set a custom title for your user interface. (default: value derived from REGISTRY_URL) (see #28 and #32). Since 0.3.4
PULL_URL: Set a custom url when you copy the docker pull command (see #71). (default: value derived from REGISTRY_URL). Since 1.1.0
DELETE_IMAGES: Set if we can delete images from the UI. (default: false)
SHOW_CONTENT_DIGEST: Show/Hide content digest in docker tag list (see #126 and #131). (default: false). Since 1.4.9
CATALOG_ELEMENTS_LIMIT: Limit the number of elements in the catalog page (see #39, #127, #132) and #306. (default: 1000). Since 1.4.9
SINGLE_REGISTRY: Remove the menu that show the dialogs to add, remove and change the endpoint of your docker registry. (default: false). Since 2.0.0
NGINX_PROXY_PASS_URL: Update the default Nginx configuration and set the proxy_pass to your backend docker registry (this avoid CORS configuration). This is usually the name of your registry container in the form http://registry:5000. Since 2.0.0
NGINX_PROXY_HEADER_*: Update the default Nginx configuration and set custom headers for your backend docker registry via environment variable and file (/etc/nginx/.env). Only when NGINX_PROXY_PASS_URL is used (see #89). Since 1.2.3
NGINX_PROXY_PASS_HEADER_*: Update the default Nginx configuration and forward custom headers to your backend docker registry via environment variable and file (/etc/nginx/.env). Only when NGINX_PROXY_PASS_URL is used (see #206). Since 2.1.0
NGINX_LISTEN_PORT: Listen on a port other than 80, you can also change the default user and set to nginx --user nginx (see #224 and #234). (default: 80 when the user is root, 8080 otherwise). Since 2.2.0
NGINX_RESOLVER: Add resolver directive to the nginx configuration for dynamic dns resolving. The value when you are using a docker network is 127.0.0.11, you can set a custom DNS server too with a valid time. This is not needed when you are using kubernetes. (see #333 and #339). (default: “). Since 2.5.5
DEFAULT_REGISTRIES: List of comma separated registry URLs (e.g http://registry.example.com,http://registry:5000), available only when SINGLE_REGISTRY=false (see #219). (default: ). Since 2.1.0
READ_ONLY_REGISTRIES: Deactivate dialog for remove and add new registries, available only when SINGLE_REGISTRY=false (see #219). (default: false). Since 2.1.0
SHOW_CATALOG_NB_TAGS: Show number of tags per images on catalog page and hide images with 0 tags. This will produce + nb images requests, not recommended on large registries (see #161 and #239). (default: false). Since 2.2.0
HISTORY_CUSTOM_LABELS: Expose custom labels in history page, custom labels will be processed like maintainer label (see #160 and #240). Since 2.2.0
USE_CONTROL_CACHE_HEADER: Use Control-Cache header and set to no-store, no-cache. This will avoid some issues on multi-arch images (see #260 and #265). This option requires registry configuration: Access-Control-Allow-Headers with Cache-Control. (default: false). Since 2.3.0
THEME: Chose your default theme, could be dark, light or auto (see #283). When auto is selected, you will have a switch to manually change from light to dark and vice-versa (see #291). (default: auto). Since 2.4.0
TAGLIST_ORDER: Set the default order for the taglist page, could be num-asc;alpha-asc, num-desc;alpha-asc, num-asc;alpha-desc, num-desc;alpha-desc, alpha-asc;num-asc, alpha-asc;num-desc, alpha-desc;num-asc or alpha-desc;num-desc (see #307). (default: alpha-asc;num-desc). Since 2.5.0
CATALOG_DEFAULT_EXPANDED: Expand by default all repositories in catalog (see #302). (default: false). Since 2.5.0
CATALOG_MIN_BRANCHES: Set the minimum repository/namespace to expand (e.g. joxit/docker-registry-uijoxit/ is the repository/namespace). Can be 0 to disable branching. (see #319). (default: 1). Since 2.5.0
CATALOG_MAX_BRANCHES: Set the maximum repository/namespace to expand (e.g. joxit/docker-registry-uijoxit/ is the repository/namespace). Can be 0 to disable branching. (see #319). (default: 1). Since 2.5.0
TAGLIST_PAGE_SIZE: Set the number of tags to display in one page. (default: 100). Since 2.5.0
REGISTRY_SECURED: By default, the UI will check on every requests if your registry is secured or not (you will see 401 responses in your console). Set to true if your registry uses Basic Authentication and divide by two the number of call to your registry. (default false). Since 2.5.0
SHOW_TAG_HISTORY: Whether to show the tag history feature or not. Allows to simplify the user interface by hiding it form the tag list if set to false. (default: true).
There are some examples with docker-compose and docker-registry-ui as proxy here or docker-registry-ui as standalone here.
Theme options
This featureswas added to version 2.4.0. See more about this in #283.
Environment variable
light theme value
dark theme value
THEME_PRIMARY_TEXT
#25313b
#98a8bd
THEME_NEUTRAL_TEXT
#777777
#6d7fab
THEME_BACKGROUND
#ffffff
#22272e
THEME_HOVER_BACKGROUND
#eeeeee
#343a4b
THEME_ACCENT_TEXT
#5f7796
#5c88ff
THEME_HEADER_TEXT
#ffffff
#ffffff
THEME_HEADER_ACCENT_TEXT
#7b9ac2
#7ea1ff
THEME_HEADER_BACKGROUND
#25313b
#333a45
THEME_FOOTER_TEXT
#ffffff
#ffffff
THEME_FOOTER_NEUTRAL_TEXT
#adbacd
#98afcf
THEME_FOOTER_BACKGROUND
#344251
#344251
Recommended Docker Registry Usage
Here is a simple usage of Docker Registry UI with Docker Registry Server using docker-compose. This example should work for most of your use case and your UI will be on the same domain as you registry.
⚠️ Before posting issues about CORS, please read the and all created issues.
⚠️ If you are using credentials and your registry is on a different host than your UI, please read the FAQ about OPTIONS, all the linked issues and distribution/distribution#4458 first. The best way for the UI to work is using NGINX_PROXY_PASS_URL or configure your own proxy (nginx, haproxy…) that will be on top of your docker registry (and not the UI!) to override OPTIONS requests.
If your docker registry does not need credentials, you will need to send this HEADER:
If your docker registry need credentials, you will need to send these HEADERS (you must add the protocol http/https and the port when not default 80/443):
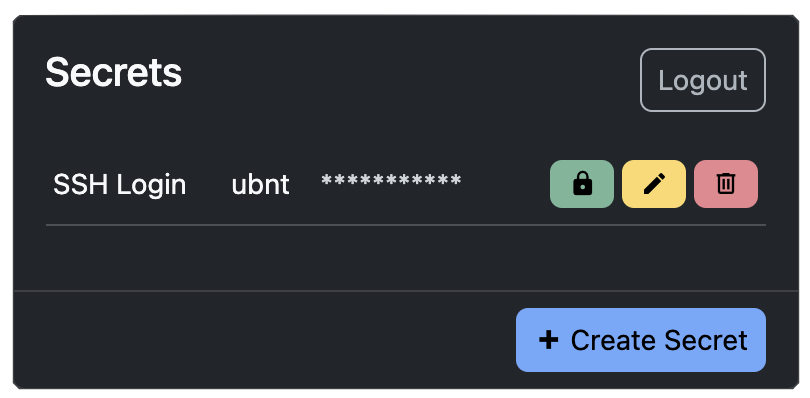
Provides convenient access to secrets stored in Hashicorp Vault via the Netbox UI. You can attach secrets on a Device, Virtual Machine or Service. The plugin is intended to serve as a possible replacement for the secrets functionality present in Netbox pre 3.0. The Netbox maintainers recommend replacing it with Vault.
It will add a card like this:
The functionality is entirely client side. The plugin uses Javascript in the browser to access the Vault API directly. Your Netbox installation will never have access to the secrets or authentication credentials in Vault.
Secrets are stored at paths per a simple convention:
/device/{id}/{slug} for Devices
/vm/{id}/{slug} for Virtual Machines
/service/{id}/{slug} for Services
Installation
This plugin is not yet available as a PyPi package. Please see the Releases for downloads.
Please note that this plugin needs a run of python manage.py collectstatic to work after being configured. For the official Docker image see the official instructions.
Setup
After installing the package, add the plugin to the Netbox configuration.
PLUGINS= ["netbox_vault_secrets"]
PLUGINS_CONFIG= {
"netbox_vault_secrets": {
"api_url": "https://your-vault-deployment/", # can be relative"kv_mount_path": "/secret", # optional"secret_path_prefix": "/netbox", # optional"login_methods": ["token", "oidc"], # optional, defaults to ["token"]"oidc": {
"mount_path": "/auth/oidc", # optional"roles": { # optional, will use `default_role` if missing"demo": "Demo Provider", # maps role name to display name
}
},
}
}
Vault CORS settings
Note that if your Vault installation runs at a different origin than Netbox, you need to enable CORS.
You can use this command (requires sudo privileges):
Android Architecture Sample App made by SangYoon Song
🌻 This app follow Google’s official architecture guidance and made with Marvle open API. Let’s take a look at the sample app specifically. Additionally, the DataLayer of this app is implemented with multiple source which means for ‘paging source‘, ‘room database‘, ‘work manager‘
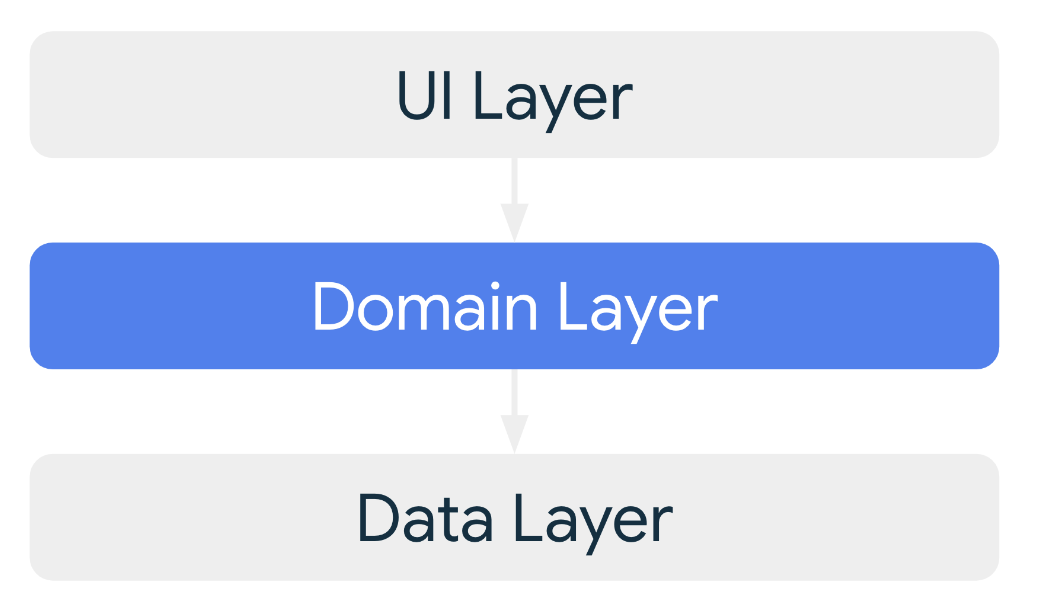
🏛️ Architecture
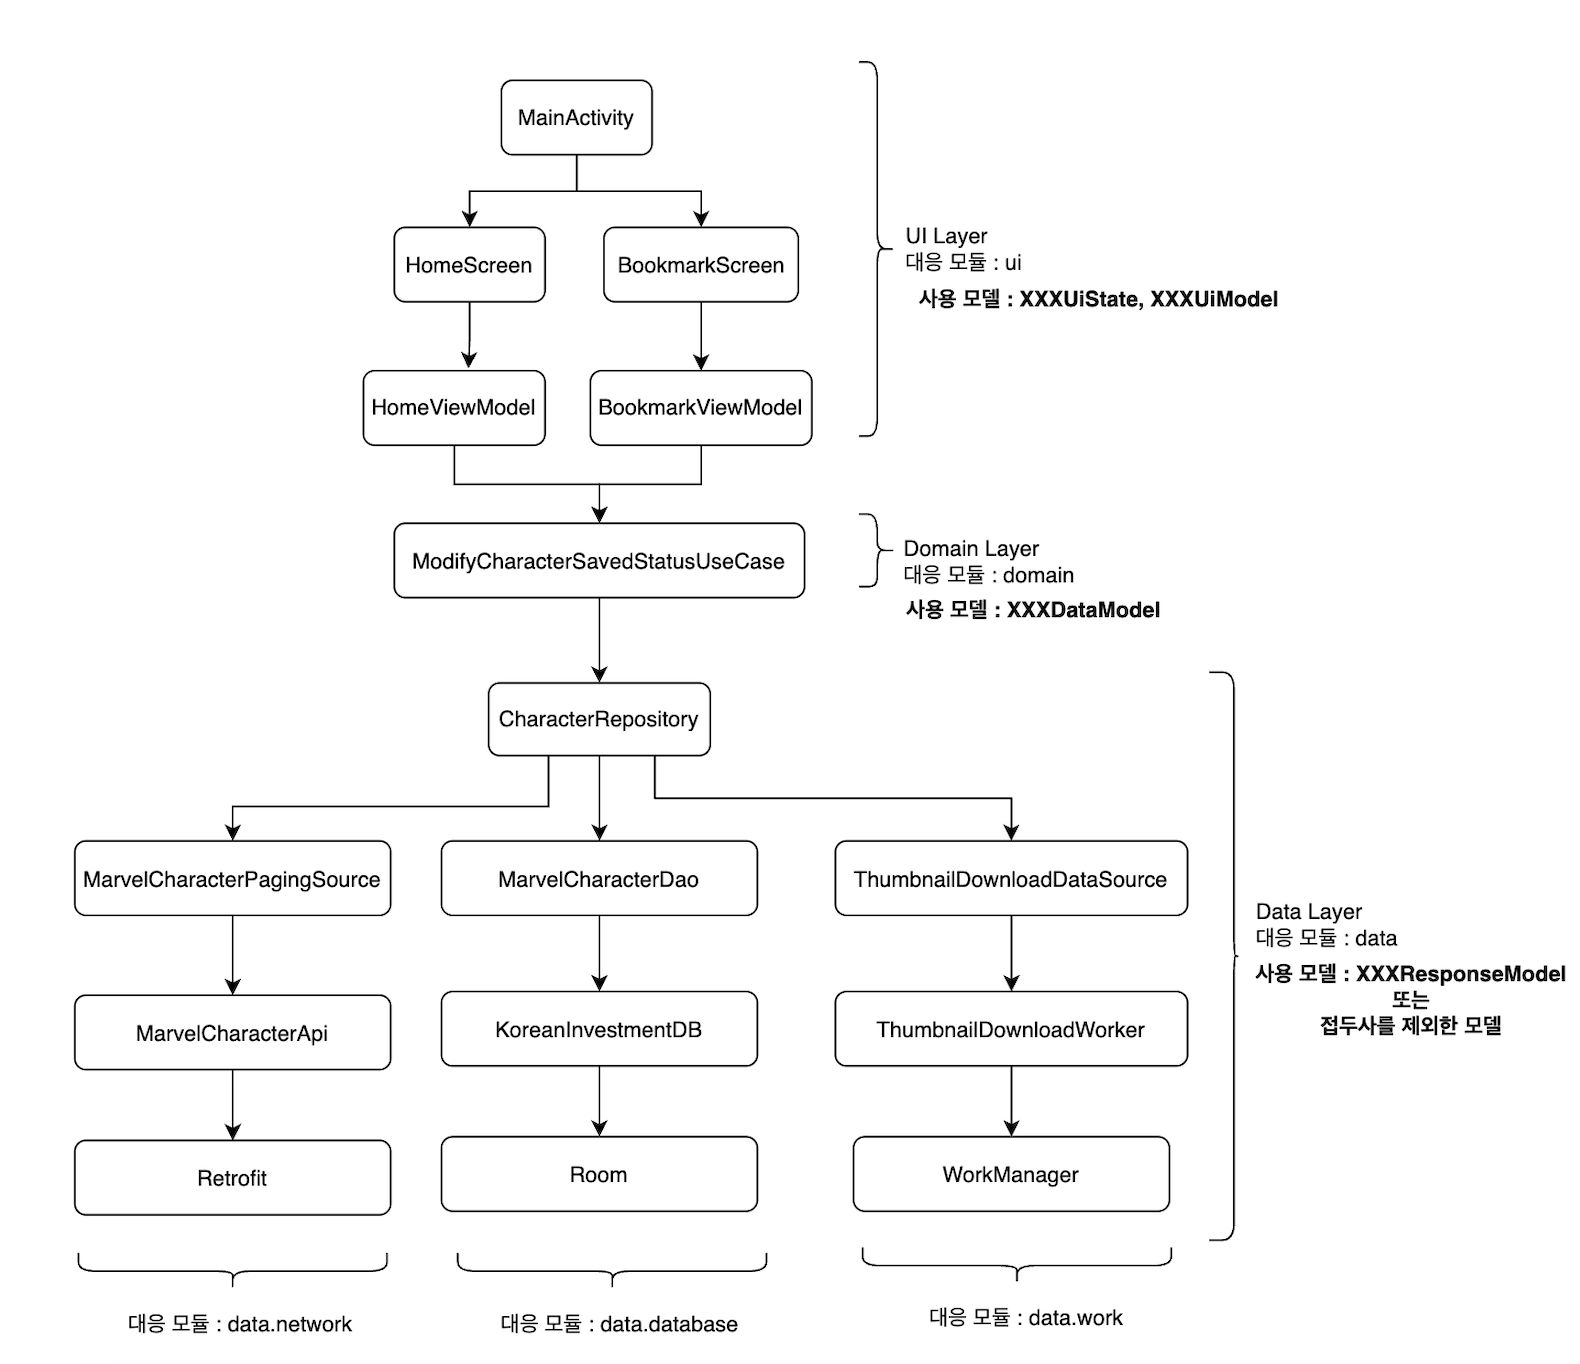
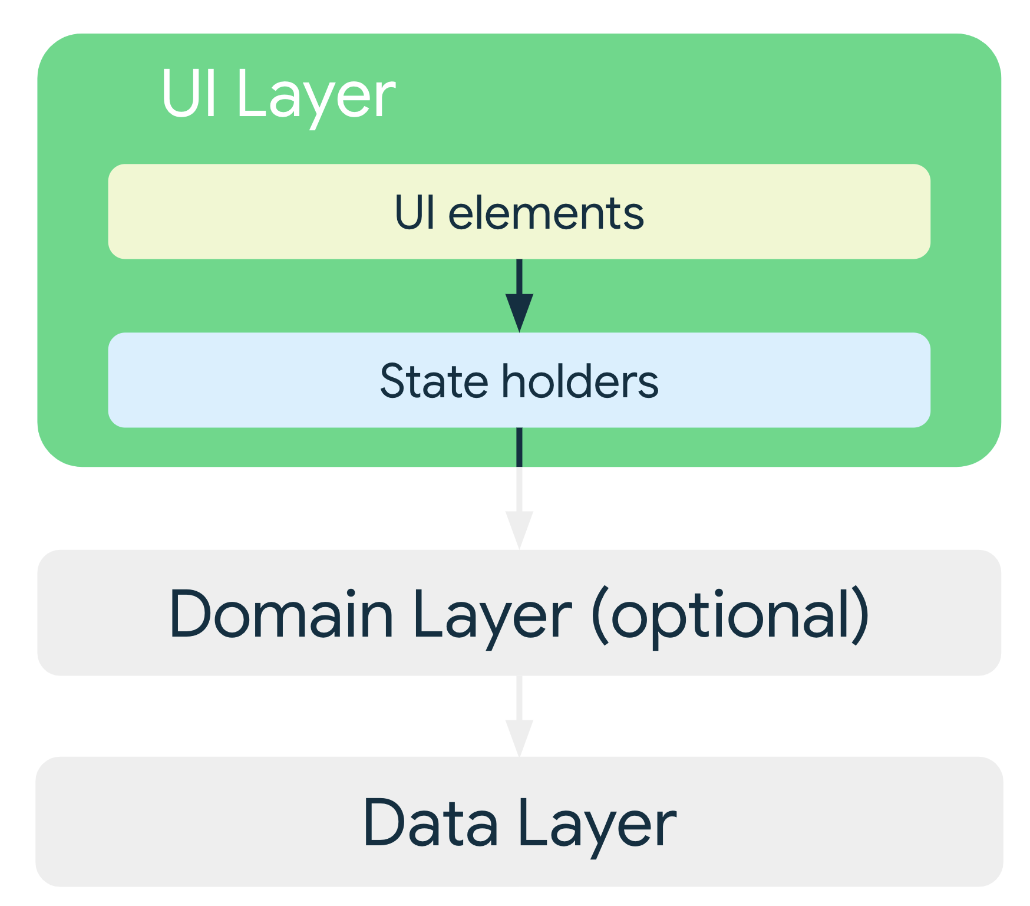
This app architecture consist of UI Layer, Domain Layer, Data Layer. and let’s explain the responsibility of each layers in order
UI layer
UI layer consist of ‘UI Element‘, ‘Data Holder Class‘ (can be think as AAC ViewModel)
👉 UI element is pure UI logic, correspond to ‘View-System UI‘ or ‘Compose UI‘ logic including ‘Button’, ‘TextField’, ‘BottomNavigation’ etc…
To put it in context with the architecture above, ‘MainActivity‘, ‘HomeScreen‘, ‘BookmarkScreen‘ correspond to this.
👉 Data Holder Class is defined in the AAC ViewModel (meaning for ‘Jetpack library’) and is a class that represents the state of the UI.
To put it in context with architecture above, ‘HomeViewModel‘, ‘BookmarkViewModel‘ correspond to this. and also define ‘CharacterUiModel‘ wrapping ‘UiResult‘ which has three state of ‘Loading‘, ‘Success‘, ‘Error‘
Domain layer
Domain Layer has two responsibility.
👉 Responsibility for defining the duplicate logic in AAC ViewModel.
👉 Responsibility for defining the complex business logic in AAC ViewModel.
To put it in context with architecture above, The domain layer of this sample app implements the responsibility of defining the duplicate logic. that is ‘ModifyCharacterSavedStatusUseCase‘
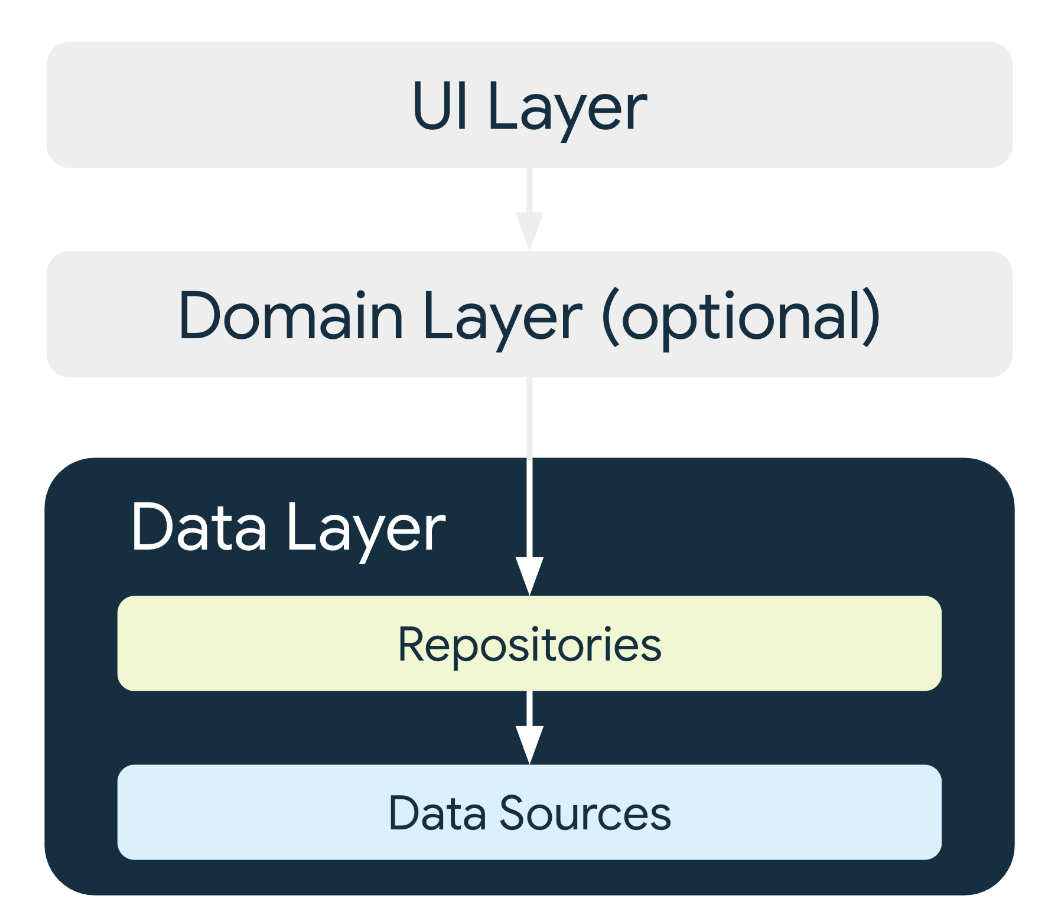
Data layer
Data Layer has ‘Repository Module‘ which is first entry point of ‘UI Layer‘ and ‘Domain Layer‘. ‘Repository Moddule‘ has three responsibilities
👉 Responsibility for querying local data from database or file system or AndroidKeyStore
👉 Responsibility for requesting remote data from network
👉 Responsible for coordinating data from remote or local data sources
To put it in context with architecture above, The repository module within Data Layer is ‘CharacterRepository’
🤝 Contribution
My sample app is not perfect and has many shortcomings. Therefore, I would be very happy if you could request a PR for the development of the app. Always welcome.
License
Designed and developed by 2024 squart300kg (sangyoon song)

Licensed under the Apache License, Version 2.0 (the "License");
you may not use this file except in compliance with the License.
You may obtain a copy of the License at

   http://www.apache.org/licenses/LICENSE-2.0

Unless required by applicable law or agreed to in writing, software
distributed under the License is distributed on an "AS IS" BASIS,
WITHOUT WARRANTIES OR CONDITIONS OF ANY KIND, either express or implied.
See the License for the specific language governing permissions and
limitations under the License.
Android Architecture Sample App made by SangYoon Song
🌻 This app follow Google’s official architecture guidance and made with Marvle open API. Let’s take a look at the sample app specifically. Additionally, the DataLayer of this app is implemented with multiple source which means for ‘paging source‘, ‘room database‘, ‘work manager‘
🏛️ Architecture
This app architecture consist of UI Layer, Domain Layer, Data Layer. and let’s explain the responsibility of each layers in order
UI layer
UI layer consist of ‘UI Element‘, ‘Data Holder Class‘ (can be think as AAC ViewModel)
👉 UI element is pure UI logic, correspond to ‘View-System UI‘ or ‘Compose UI‘ logic including ‘Button’, ‘TextField’, ‘BottomNavigation’ etc…
To put it in context with the architecture above, ‘MainActivity‘, ‘HomeScreen‘, ‘BookmarkScreen‘ correspond to this.
👉 Data Holder Class is defined in the AAC ViewModel (meaning for ‘Jetpack library’) and is a class that represents the state of the UI.
To put it in context with architecture above, ‘HomeViewModel‘, ‘BookmarkViewModel‘ correspond to this. and also define ‘CharacterUiModel‘ wrapping ‘UiResult‘ which has three state of ‘Loading‘, ‘Success‘, ‘Error‘
Domain layer
Domain Layer has two responsibility.
👉 Responsibility for defining the duplicate logic in AAC ViewModel.
👉 Responsibility for defining the complex business logic in AAC ViewModel.
To put it in context with architecture above, The domain layer of this sample app implements the responsibility of defining the duplicate logic. that is ‘ModifyCharacterSavedStatusUseCase‘
Data layer
Data Layer has ‘Repository Module‘ which is first entry point of ‘UI Layer‘ and ‘Domain Layer‘. ‘Repository Moddule‘ has three responsibilities
👉 Responsibility for querying local data from database or file system or AndroidKeyStore
👉 Responsibility for requesting remote data from network
👉 Responsible for coordinating data from remote or local data sources
To put it in context with architecture above, The repository module within Data Layer is ‘CharacterRepository’
🤝 Contribution
My sample app is not perfect and has many shortcomings. Therefore, I would be very happy if you could request a PR for the development of the app. Always welcome.
License
Designed and developed by 2024 squart300kg (sangyoon song)

Licensed under the Apache License, Version 2.0 (the "License");
you may not use this file except in compliance with the License.
You may obtain a copy of the License at

   http://www.apache.org/licenses/LICENSE-2.0

Unless required by applicable law or agreed to in writing, software
distributed under the License is distributed on an "AS IS" BASIS,
WITHOUT WARRANTIES OR CONDITIONS OF ANY KIND, either express or implied.
See the License for the specific language governing permissions and
limitations under the License.
Play around with the cube, the sphere and the tetrahedron using various lighting and material parameters in the program! Try it here!
UI of the WebGL program
🔽 Interactive Animation
Each 3D shape can be rotated in 4 directions: up, down, left and right.
You can use:
Arrow keys to control rotation of all 3D shapes
Buttons to control rotation of each individual 3D shape
The animation is a continuous rotation about the y-axis. You can press:
ENTER key to start the animation for all 3D shapes
START button to start the animation for each individual 3D shape
🔽 Lighting and Shading
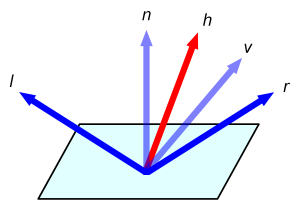
The Blinn-Phong lighting model, also known as the modified Phong model, is used to render 3D shapes under various lighting conditions and material properties.
Blinn-Phong Model
Phong Shading, also known as per-fragment shading, is used to apply the lighting model to each fragment. Shading calculations are performed in the fragment shader on a per-fragment basis.
There are various lighting and material parameters that can be manipulated in the program:
Intensities of ambient, diffuse and specular light sources
Material properties of each 3D shape for ambient, diffuse and specular reflections
Position of light source in terms of its x, y and z-coordinates
Shininess coefficient for specular reflection
🔽 Texture Mapping
Texture mapping is the process of painting an image onto the fragments to materialise the effect of rendering a surface with custom texture. As for now, WebGL only support 2D mapping. In the program, there is a set of 6 images that can be selected for texture mapping.
✒️ References
Angel, E., & Shreiner, D. (2015). Interactive Computer Graphics (7th ed.). Pearson Education.
IE 9+, Chrome, Firefox, Safari, Opera (including Mobile devices).
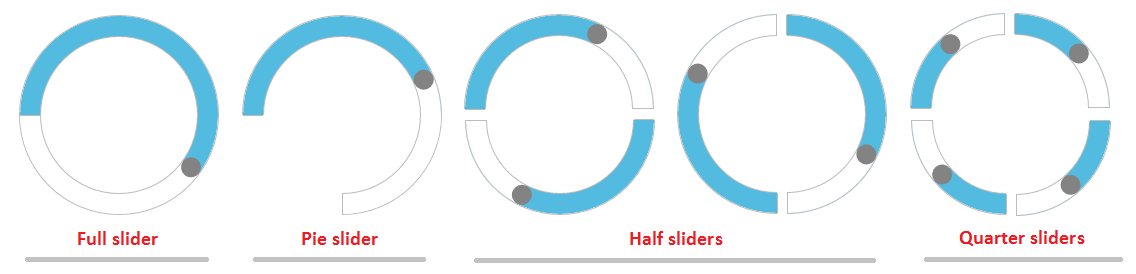
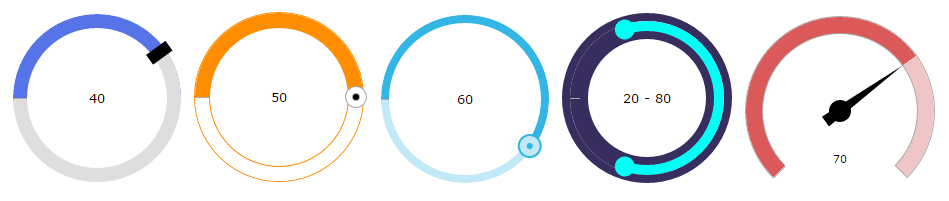
Options
The roundSlider has several properties and events to interact with the control programmatically.
To know more about the Options, please check the documentation.
$("#slider").roundSlider({min: 0,max: 100,step: 1,value: null,radius: 85,width: 16,handleSize: "+0",startAngle: 0,endAngle: "+360",animation: true,showTooltip: true,editableTooltip: true,readOnly: false,disabled: false,keyboardAction: true,mouseScrollAction: false,sliderType: "default",circleShape: "full",handleShape: "round",lineCap: "butt",// the 'startValue' property decides at which point the slider should start.// otherwise, by default the slider starts with min value. this is mainly used// for min-range slider, where you can customize the min-range start position.startValue: null,// SVG related propertiessvgMode: false,borderWidth: 1,borderColor: null,pathColor: null,rangeColor: null,tooltipColor: null,// eventsbeforeCreate: null,create: null,start: null,// 'beforeValueChange' will be triggered before 'valueChange', and it can be cancellablebeforeValueChange: null,drag: null,change: null,// 'update' event is the combination of 'drag' and 'change'update: null,// 'valueChange' event is similar to 'update' event, in addition it will trigger// even the value was changed through programmatically also.valueChange: null,stop: null,tooltipFormat: null});
IE 9+, Chrome, Firefox, Safari, Opera (including Mobile devices).
Options
The roundSlider has several properties and events to interact with the control programmatically.
To know more about the Options, please check the documentation.
$("#slider").roundSlider({min: 0,max: 100,step: 1,value: null,radius: 85,width: 16,handleSize: "+0",startAngle: 0,endAngle: "+360",animation: true,showTooltip: true,editableTooltip: true,readOnly: false,disabled: false,keyboardAction: true,mouseScrollAction: false,sliderType: "default",circleShape: "full",handleShape: "round",lineCap: "butt",// the 'startValue' property decides at which point the slider should start.// otherwise, by default the slider starts with min value. this is mainly used// for min-range slider, where you can customize the min-range start position.startValue: null,// SVG related propertiessvgMode: false,borderWidth: 1,borderColor: null,pathColor: null,rangeColor: null,tooltipColor: null,// eventsbeforeCreate: null,create: null,start: null,// 'beforeValueChange' will be triggered before 'valueChange', and it can be cancellablebeforeValueChange: null,drag: null,change: null,// 'update' event is the combination of 'drag' and 'change'update: null,// 'valueChange' event is similar to 'update' event, in addition it will trigger// even the value was changed through programmatically also.valueChange: null,stop: null,tooltipFormat: null});
Please be aware that all PlatformInfo and SMBIOS information was removed from the OpenCore config.plist files. Users will therefore need to generate their own PlatformInfo with CorpNewt’s GenSMBIOS tool before attempting to boot with this repository’s EFI folder.
I added “-v debug=0x100 keepsyms=1” BootArgs, to debug, after installation you can clear bootarg’s. If you can’t boot, please check Dortania’s OpenCore Install Guide
No Issues, ~5 Hours of Video Playback on 50% brightness
Power
230W Power Adapter
No Issues
What needs some more work
Sleep by closing lid
What will never work
NVIDIA GeForce RTX 3060 dGPU (disabled with an SSDT)
HDMI output (hardwired to the NVIDIA dGPU)
Airdrop (WiFi Module need to be replaced)
UEFI BIOS Configuration
Many other Razer Blade machines need to unlock the BIOS and change the SAC to work properly, but software Mod of BIOS is locked, it can be Modified only by hardware method.
Reboot computer
Repeatedly press the F1 or DEL key to enter the UEFI BIOS configuration menu
Advanced
* Thrusted Computing
* Disable Secutiry Device Support
Chipset
SATA And RST Configuration
Check SATA Mode Selection set to AHCI
Security
Set Secure Boot to Disabled
Boot
Set Fast Boot to Disabled
CSM Configuration
Set CSM Support to Disabled
Save and Exit
Hit Save Changes
Hit Save Changes and Reset
Sound
If your audio is not working, try different ALC Layout ID, my work perfect with LayoutID=21, otherwise try: 3, 11, 13, 16, 21, 22, 28, 29, 30, 32, 47, 66, 72, 99. The detailed ALC configuration can refer to here: AppleALC Supported Codecs
Sleep
Sleep working fine, if you go to sleep before closing lid, if you try sleep by closing lid, you will be wake in black screen.
Conclusion
If your machine run in to any problems or malfunctions during installation, I will not be responsible for that, so use this EFI at your own risk! Good luck, have fun, share your success to others may be able to help a lot!
Native HiDPI display settings in macOS
To enable native HiDPI settings in the Display Preferences of macOS, download and run the one-key-hidpi script and select the option (1) 1920x1080 Display.
Please ensure all dependencies are available on the CircuitPython filesystem.
This is easily achieved by downloading
the Adafruit library and driver bundle.
Sphinx is used to build the documentation based on rST files and comments in the code. First,
install dependencies (feel free to reuse the virtual environment from above):
Now, once you have the virtual environment activated:
cd docs
sphinx-build -E -W -b html . _build/html
This will output the documentation to docs/_build/html. Open the index.html in your browser to
view them. It will also (due to -W) error out on any warning like Travis will. This is a good way to
locally verify it will pass.


 https://github.com/AlexPresso/ZUnivers-Webhooks